我開發了一款簡單但也有細節的 To-Do App
前言

前言
我是 vickcoo,是一名剛要轉職成為 iOS 工程師的人,所以有任何意見想提出我都非常樂意!
為什麼我要寫這一篇文章(aka. 筆記)呢?因為如標題我要開發一個很簡單的 To Do App,一方面這是個很好拿來當做第一個練手的題材,以及為了求職所準備的,因為我完全沒有 iOS 開發的工作經驗,以前都是寫 Web 所以想要有作品即使它不是什麼有創意或是複雜的程式,但比起口頭上說我會了些什麼,不如拿出東西來展現也比較有說服力!
本篇就會介紹開發過程中,我認為值得紀錄下供後人以及我自己有需要的時後可以參考。
需要看原始碼的可以到 GitHub vickcoo/odot 中查看。
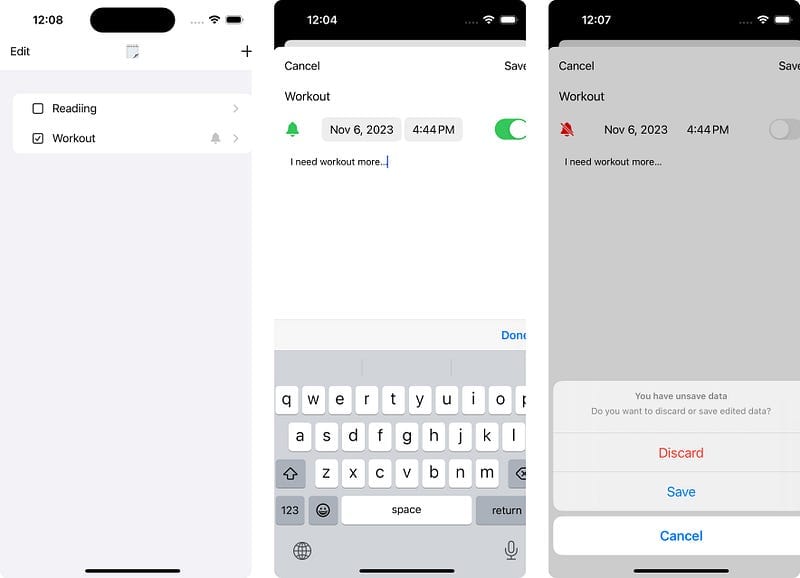
畫面展示
功能介紹 & 技術細節
技術含量或許不多,不過對於不熟悉這些技術或是剛入行的 iOS 工程師們能有點幫助,以下是大綱沒有順序的分別介紹各個技術細節。
- 新增待辨項目:會新開頁面來提供畫面輸入資料來新增
- 編輯待辨項目:會新開頁面來提供畫面輸入資料來更新,若資料變更未儲存並點擊取消會彈出訊息讓你確認是否要儲存或放棄修改
- 提醒通知:可以設定指定的日期時間來發送通知
- 持久化存儲:資料都是儲存在本地端(使用者的設備上)
- 多國語系:目前只支持中文以及英文
- 自訂 Cell:除了基本的標題還自訂了 CheckBox 來提供點擊完成該待辨項目
待辨項目的 UITableView
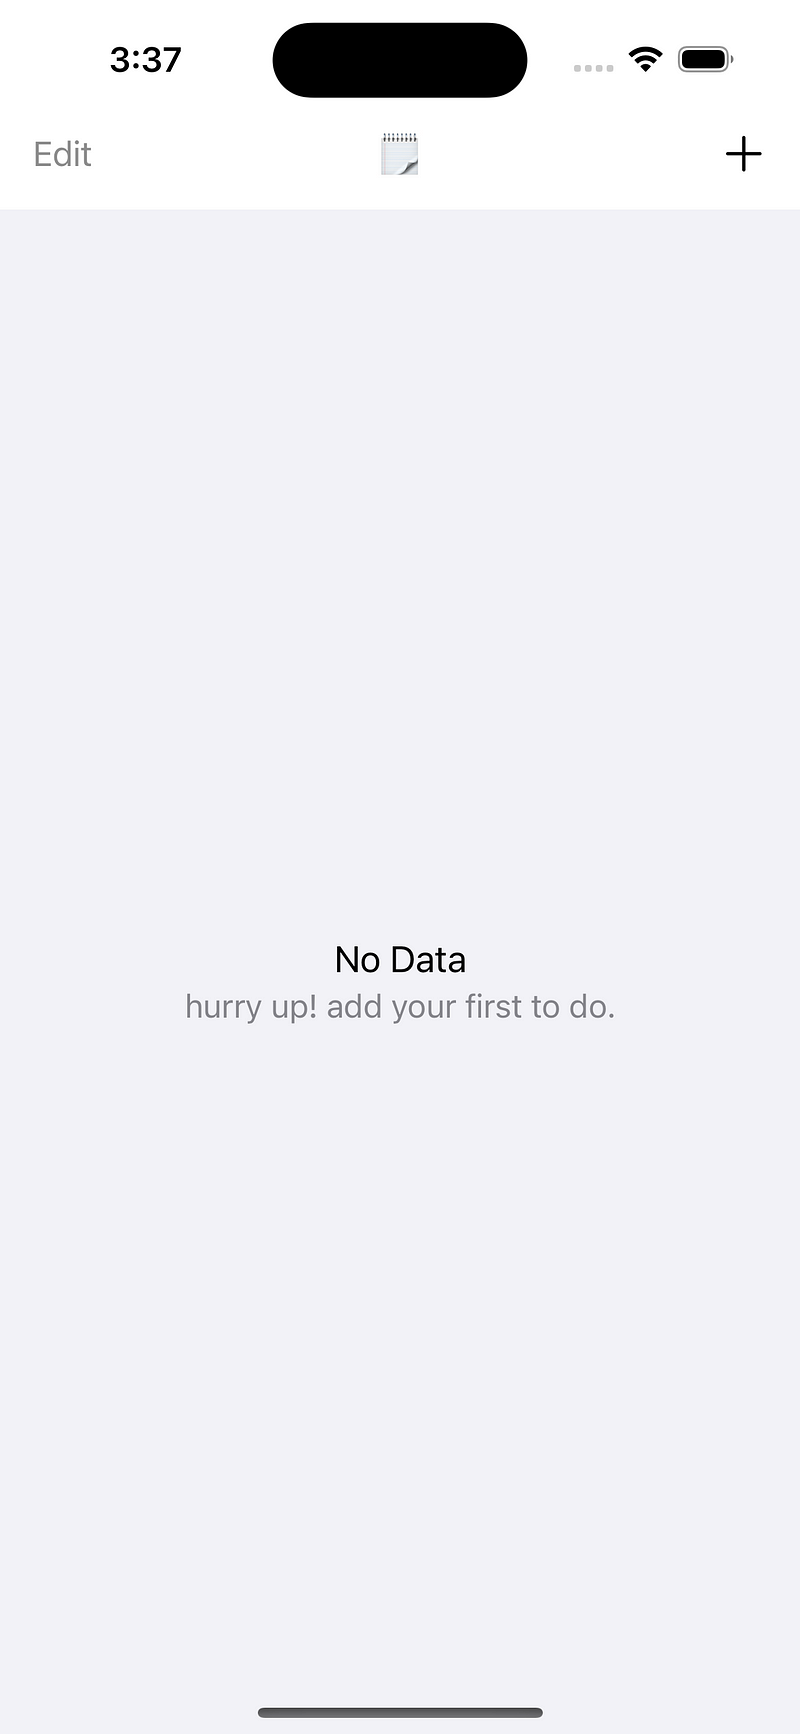
- 沒有任何資料時會顯示文字來告訴使用者,增強使用者體驗
- 基本的排序、刪除、新增功能
- 鍵盤:
- 會自動調整筆記欄位的高度,簡單來說就是鍵盤彈出不會擋到要輸入文字的地方
- 點擊非輸入框的位置隱藏鍵盤
- 點擊完成(Done)按鈕隱藏鍵盤
- 點擊新增進到畫面時會自動將焦點放在標題欄,並且彈出鍵盤
- 在標題欄點擊鍵盤的 Next 鍵會將焦點放在筆記欄
其他
- 轉跳到系統的設定
- NotificationCenter
大綱
技術含量或許不深,不過對於不熟悉這些技術或是剛入行的 iOS 工程師們能有點幫助,以下是大綱沒有順序的分別介紹各個技術細節,可以利用下面的 關鍵字去找文章中你想看的部分。
- 多國語系
- 跑 Simulator 時更方便的測試不同語言
- 本地端資料儲存
- NotificationCenter 監聽事件
- 發送通知
- 轉跳到系統的設定
- 利用 Button 實現 CheckBox 功能
UITableView
- UITableViewDataSource
- UITableViewDelegate
- 沒有資料時顯示文字
鍵盤處理
- 彈出鍵盤
- 文字輸入框被鍵盤擋住
- 隱藏鍵盤:在鍵盤上方新增按鈕
- 隱藏鍵盤:點擊畫面其餘空白部分
UITableView
入門首先最常接觸的大概就屬 UITableView 了吧,主要會要遵循 UITableViewDataSource 跟 UITableViewDelegate ,而這兩個 Protocol 的職責分別是負責什麼呢?
UITableViewDataSource
如它的名字所代表的就是關於資料方面的處理。
其中之一必須要實作的是這個 cellForRowAt,它所要做的是告訴 UITableView 你要讓 Cell(指的是每一行資料) 怎麼樣呈現以及要什麼資料,接下來這個 numberOfRowInSection 也必須要實作,它要做的事就是告訴 UITableView 你的畫面中要顯示出多少筆資料。
// 要呈現什麼樣的資料
func tableView(_ tableView: UITableView, cellForRowAt indexPath: IndexPath) -> UITableViewCell

// 要顯示的資料筆數
func tableView(_ tableView: UITableView, numberOfRowsInSection section: Int) -> Int
UITableViewDelegate
它是負責處理一些對 UITableView 的操作所觸發的事件,例子如下:
要對資料做排序需實作 moveRowAt,可以多利用 Autocomplete 輸入關鍵字 moveRowAt;要刪除資料需實作 commit,一樣可以輸入關鍵字 commit。
// 排序資料
func tableView(_ tableView: UITableView, moveRowAt sourceIndexPath: IndexPath, to destinationIndexPath: IndexPath)

// 刪除資料
func tableView(_ tableView: UITableView, commit editingStyle: UITableViewCell.EditingStyle, forRowAt indexPath: IndexPath)
當沒有資料時顯示文字
這個功能的實現是參考這篇文章 Handle Empty TableView in Swift 4 & iOS 11
這個主要是讓使用者體驗更好一點,沒有任何資料時讓使用者知道,或是提供訊息告訴他們要去哪新增資料。主要的概念是當 UITableView 沒有資料的時候設定一個自訂的 UIView,有資料的時候就將這個自訂的刪除。
實作主要分兩部分,幫 UITableView 擴充兩個 Function:
setEmptyView就是建立自訂的 View 裡面很簡單就是放兩個UILabel來顯示文字removeEmptyView就是把這個 View 刪除
extension UITableView {
    /// Display a message on the `UITableView` center, notice you need to call `removeEmptyView()` when table hasn't any row.
    func setEmptyView(title: String, message: String) {
        let backgroundView = UIView()

        let titleLabel = UILabel()
        titleLabel.translatesAutoresizingMaskIntoConstraints = false
        titleLabel.text = title
        titleLabel.font = .systemFont(ofSize: 18)
        titleLabel.textColor = .label
        backgroundView.addSubview(titleLabel)

        let messageLabel = UILabel()
        messageLabel.translatesAutoresizingMaskIntoConstraints = false
        messageLabel.text = message
        messageLabel.font = .systemFont(ofSize: 16)
        messageLabel.textColor = .secondaryLabel
        backgroundView.addSubview(messageLabel)

        NSLayoutConstraint.activate([
            titleLabel.centerXAnchor.constraint(equalTo: backgroundView.centerXAnchor),
            titleLabel.centerYAnchor.constraint(equalTo: backgroundView.centerYAnchor, constant: -6),
            messageLabel.centerXAnchor.constraint(equalTo: backgroundView.centerXAnchor),
            messageLabel.centerYAnchor.constraint(equalTo: titleLabel.bottomAnchor, constant: 12)
        ])

        self.backgroundView = backgroundView
    }

    /// Clean the message that  you have set before by `setEmptyView(title: String, message: String)`
    func removeEmptyView() {
        self.backgroundView = nil
    }
}- 第二個要實作的就是何時要顯示出這個自訂的 View,何時要刪除?想想看我們前面介紹的
UITableViewDataSource,這裡是很好判斷的地方,重點在第 2 行到第 6 行,判斷有沒有資料來決定要不要顯示自訂的 View
func tableView(_ tableView: UITableView, numberOfRowsInSection section: Int) -> Int {
    if myData.isEmpty {
        tableView.setEmptyView(title: title, message: message)
    } else {
        tableView.removeEmptyView()
    }
    return myData.count
}
如何切換編輯模式
這裡指的是在 iOS App 中常見的編輯按鈕點擊後,右邊會出現可以拖動排序,左邊會有紅色減號可以刪除。
將你設定的按鈕點擊事件中放入這段程式碼,就能夠做編輯的切換。
// @IBOutlet var tableView: UITableView!

if tableView.isEditing {
    tableView.setEditing(false, animated: true)
} else {
    tableView.setEditing(true, animated: true)
}s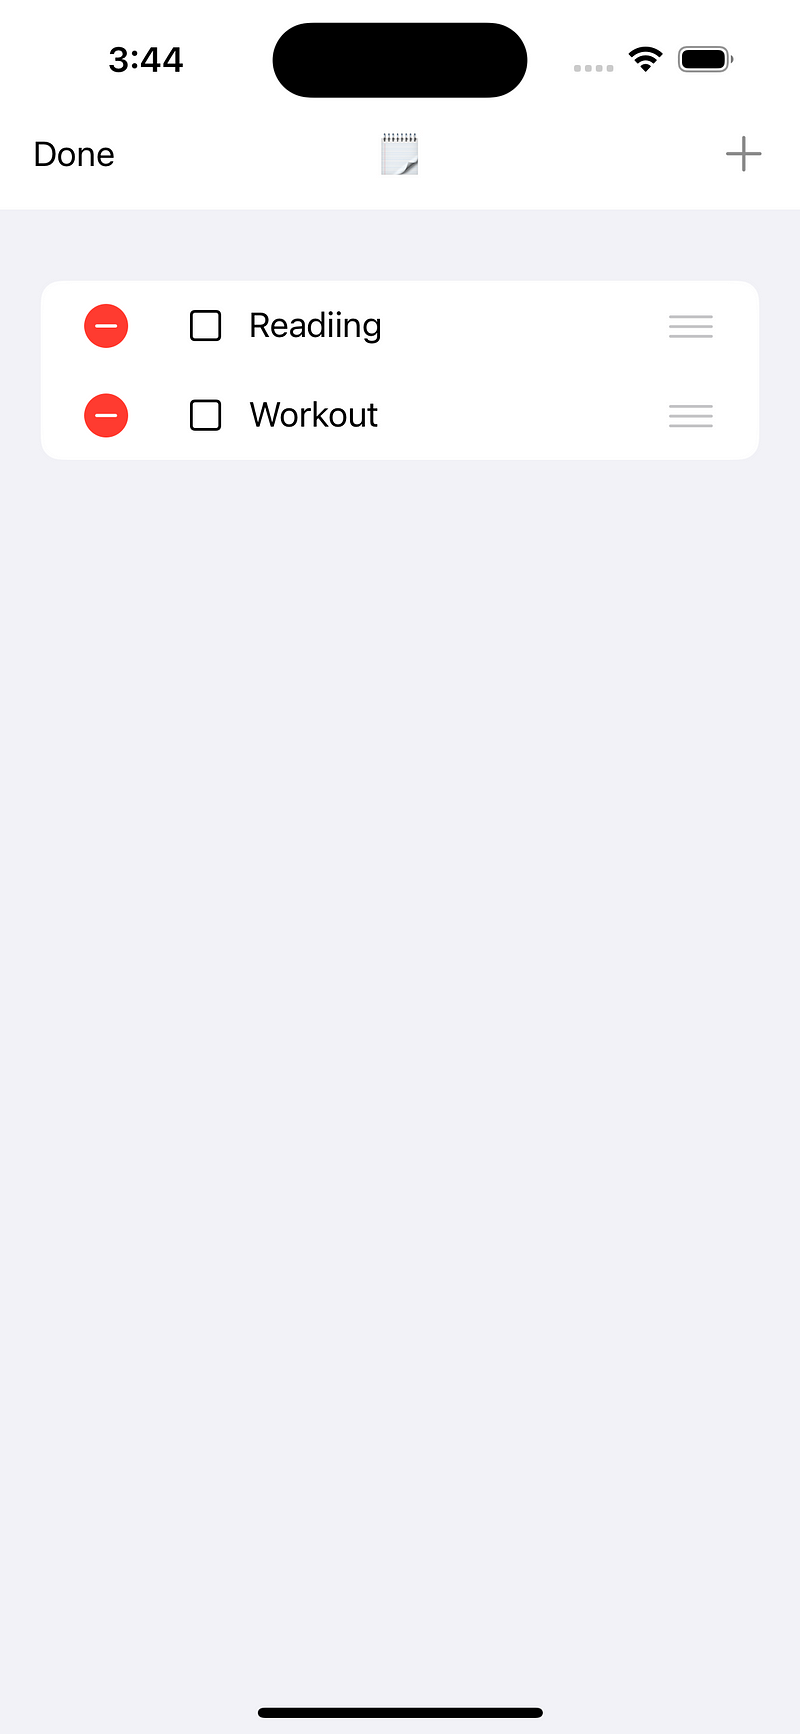
多國語系 Localization
這個 App 也有多語言支持(也只有中文跟英文)。
使用的是在 Xcode 15 推出的 String Catalogs
可以在 WWDC23 這個影片中 What’s new in Xcode 15 查看這段 Meet string catalogs。
設定起來其實非常簡單,大致分為兩個部分:
- 在
專案 > Project > Info > Localizations這裡新增你想要支援的語言 - 先新建一個
String Catalog的檔案,接著在程式碼中要支援多國語系的 String 改成這樣,當你編譯(⌘ + B)成功後就會在檔案裡自動出現你所有設定的 String 了
String(localized: "Hello World!")跑 Simulator 時更方便的測試不同語言
參考 @sarunw 的這篇文章 How to quickly test apps in other languages with an Xcode scheme
可以追蹤他的 X ( 原 Twitter ) 時常會有一些開發時小技巧的分享 👉🏻 @sarunw
在 Xcode 上方點選 Scheme( ^ + 0)並複製一份,然後在編輯這個 Scheme 的畫面中找到 Run > Options > App Language 設定好語言,接著跑起來 (⌘ + R) 的時候就會依你這個 Scheme 設定的語言啟動 App了。
本地端資料儲存
參考 @sarunw 的這篇文章 Better way to get paths to system directories in iOS 16
因為 Apple 為了確保執行階段的安全性,所以 iOS App 的環境是基於 Sandbox 的機制去實現的,所以每個 App 都有自己獨立的資料存儲目錄不會跟其它 App 打架。
所以這邊我們使用 FileManager 取得 url,這邊也提供在 iOS16 以後提供更簡單的方式取得目錄,取得目錄之後就要設定好我們的檔名以及副檔名,這邊我的檔案是 todo 副檔名是 json。
// 常見取得 url 的方式
let documentsDirectory = try? FileManager.default.url(for: .documentDirectory, in: .userDomainMask, appropriateFor: nil, create: false)
// iOS16 以後可以用更簡單的方式
let documentsDirectory = URL.documentsDirectory
// 設定檔名以及副檔名
let documentURL = directoryURL.appending(components: "todo").appendingPathExtension("json")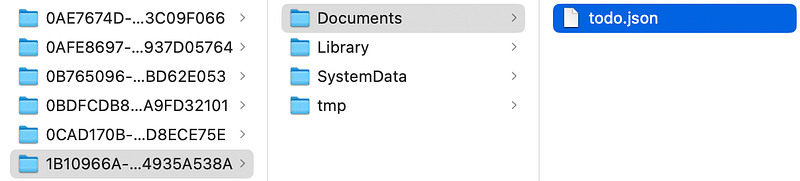
接著就是使用 JSONEncoder 將資料 encode 為 json 的資料,這邊要注意的是要可以 encode 跟 decode 的話,不管你是用 Struct 或 Class 都需要遵循 Codable 這個 Protocol,否則 Xcode 就會報錯給你看了。
// let items: [ToDoItem]
func save() {
    let directoryURL = URL.documentsDirectory
    let documentURL = directoryURL.appending(components: "todo").appendingPathExtension("json")
    let jsonEncoder = JSONEncoder()
    let data = try? jsonEncoder.encode(items)
    do {
        try data?.write(to: documentURL)
    } catch {
        logger.error("Couldn't write data of toDoItems to: \(documentURL.absoluteString)")
    }
}
jsonDecoder.decode 第一個參數要給的是資料的型別,因為我要儲存的資料是用陣列,所以會使用 Array<YourDataType>.self注後最後有一個 completed() 是提供外部呼叫並且資料載入完成後,利用傳入 Closure 來更新畫面中的資料。
// struct ToDoItem {}

func load(completed: @escaping () -> ()) {
    let directoryURL = URL.documentsDirectory
    let documentURL = directoryURL.appending(components: "todo").appendingPathExtension("json")
    let jsonDecoder = JSONDecoder()
    guard let data = try? Data(contentsOf: documentURL) else { return }
    do {
        try items = jsonDecoder.decode(Array<ToDoItem>.self, from: data)
    } catch {
        logger.error("Couldn't load data of toDoItems from: \(documentURL.absoluteString)")
    }
    completed()
}
NotificationCenter 監聽事件
在 Swift 中你如果要監聽(又稱觀察 Observe)某些事件就會需要使用 NotificationCenter,例如鍵盤按鈕 Return 鍵、TextField 裡的文字發生變化等等。
新增要監聽的事件我們使用 addObserver 要給出四個參數:
- observer:事件觸發要執行 Function 在哪個物件
- selector:事件觸發要執行的 Function
- name:監聽哪個事件
- object:查了文件還是看不太懂,目前是使用
nil
// addObserver 所需參數
func addObserver(
    _ observer: Any,
    selector aSelector: Selector,
    name aName: NSNotification.Name?,
    object anObject: Any?
)

// 實際呼叫 `addObserver` 的例子
NotificationCenter.default.addObserver(self, selector: #selector(adjustForKeyboard), name: UIResponder.keyboardWillChangeFrameNotification, object: nil)
刪除原本新增要監聽的事件則是使用 removeObserver。
NotificationCenter.default.removeObserver(self, name: UIResponder.keyboardWillChangeFrameNotification, object: nil)鍵盤處理
這裡可以處理的也很多,主要也是提升使用者體驗。
彈出鍵盤
首先進新增待辨項目的頁面,就代表十之八九是要輸入資料吧?所以可以貼心的將輸入的焦點在標題欄(例子中是用titleTextField)並且直接彈出鍵盤,讓使用者打開畫面就可以直接輸入文字,而不用再多點擊一下輸入框才能輸入文字。
titleTextField.becomeFirstResponder()文字輸入框被鍵盤擋住
參考 @Paul Husdon 的這篇文章 Fixing the keyboard: NotificationCenter
如果不知道怎麼開始學習開發 iOS App 可以到他的網站 Hacking With Swift 有一系列的入門教學,影片文字的版本都有!
需要利用前面說的 NotificationCenter 來監聽鍵盤的事件:
keyboardWillChangeFrameNotification可以監聽鍵盤的顯示、隱藏、旋轉方向等等keyboardWillHideNotification會需要使用這個事件,這邊是參考 Paul Husdon 的文章,意思是說他測試時發現keyboardWillChangeFrameNotification不足以捕獲到硬體鍵盤連接
let notificationCenter = NotificationCenter.default
notificationCenter.addObserver(self, selector: #selector(adjustForKeyboard), name: UIResponder.keyboardWillHideNotification, object: nil)
notificationCenter.addObserver(self, selector: #selector(adjustForKeyboard), name: UIResponder.keyboardWillChangeFrameNotification, object: nil)接著就是要在事件觸發後處理輸入框被遮擋的問題,keyboardFrameEndUserInfoKey
設定 noteTextView 的 contentInset 代表會將 noteTextView 的底部往上推我指指定的距離,設定為 .zero 就是改回預設值
scrollIndicatorInsets 的原理也一樣,只不過是變成設定旁邊顯示的 Scroll Bar。
// @IBOutlet var noteTextView: TextView!

@objc func adjustForKeyboard(_ notification: Notification) {
    guard let keyboardValue = notification.userInfo?[UIResponder.keyboardFrameEndUserInfoKey] as? NSValue else { return }
    let keyboardScreenEndFrame = keyboardValue.cgRectValue
    let keyboardViewEndFrame = view.convert(keyboardScreenEndFrame, from: view.window)
    if notification.name == UIResponder.keyboardWillHideNotification {
        noteTextView.contentInset = .zero
    } else {
        noteTextView.contentInset = UIEdgeInsets(top: 0, left: 0, bottom: keyboardViewEndFrame.height - view.safeAreaInsets.bottom, right: 0)
    }
    noteTextView.scrollIndicatorInsets = noteTextView.contentInset
    noteTextView.scrollRangeToVisible(noteTextView.selectedRange)
}
隱藏鍵盤: 在鍵盤上方新增按鈕
在很多 App 中可以看到鍵盤上方都會有一個完成(Done) 的按鈕,點擊後就會隱藏鍵盤,這是通過一個 UIToolBar 來實現。
這邊 ToolBar 由兩個 Item 組成 doneButton 是主要用來隱藏鍵盤的按鈕,flexSpace 用來填充空白將 doneButton 推到最右邊,接著因為我想讓所有輸入框都能顯示這個按鈕所以利用 inputAccessoryView 來將 ToolBar 設定上去。
// add a 'Done' button to provide a function for hide keyboard.
let toolbar = UIToolbar()
let flexSpace = UIBarButtonItem(barButtonSystemItem: .flexibleSpace, target: nil, action: nil)
let doneButton = UIBarButtonItem(title: String(localized: "Done"), style: .done, target: self, action: #selector(hideKeyboardDoneButtonTapped))
toolbar.setItems([flexSpace, doneButton], animated: true)
toolbar.sizeToFit()
noteTextView.inputAccessoryView = toolbar
titleTextField.inputAccessoryView = toolbar
隱藏鍵盤: 點擊畫面其餘空白部分
新增點擊手勢來隱藏鍵盤。
// Hide keyboard when user tapped other position on the view.
let tap = UITapGestureRecognizer(target: self.view, action: #selector(UIView.endEditing(_:)))
self.view.addGestureRecognizer(tap)
發送通知
這裡的通知跟 NotificationCenter 是不一樣的東西,請不要搞混哦!
這裡的範例都是使用本地端發送通知,要 import UserNotifications,組成通知主要分成三個部分: Content 內容 Trigger 觸發方式 * Request 請求發送通知
首先要建立一個 Content 也就是通知所要發出的內容,使用 UNMutableNotificationContent。
let content = UNMutableNotificationContent()
content.title = "標題"
content.subtitle = "副標題"
content.body = "內容"
content.badge = nil
content.sound = .default
接著 Trigger 有四種可以選擇,我們使用 UNCalendarNotificationTrigger 在指定的日期時間發送通知](https://developer.apple.com/documentation/usernotifications/unmutablenotificationcontent)。
var dateComponent = Calendar.current.dateComponents([.year, .month, .day, .hour, .minute], from: Date())
let trigger = UNCalendarNotificationTrigger(dateMatching: dateComponent, repeats: false)
最後將前面的 Content 跟 Trigger 組合起來成 UNNotificationRequest。
// 將 Content 跟 Trigger 組成 Request
let notificationID = UUID().uuidString
let request = UNNotificationRequest(identifier: notificationID, content: content, trigger: trigger)

// 將通知加入排程,並且加入錯誤處理
UNUserNotificationCenter.current().add(request) { error in
    if let error = error {
        print("\(error.localizedDescription)")
    }
}
轉跳到系統的設定 App
當使用者安裝完 App 後,你向他們請求發送通知的權限但是被拒絕了,然後某他使用者用到的某些功能必須要有通知權限才能執行,這時候提供一個簡單的方法讓使用者可以點一下就可以跳到設定 App 是不是會讓他們更願意去給予權限。
那要如何達成呢?主要核心就兩行而已,第一個是取得在你的 App 在設定中的 URL,第二個就是跳轉到那裡去!
let url = URL(string: UIApplication.openSettingsURLString)!
UIApplication.shared.open(url)
利用 Button 實現 CheckBox 功能
因為這篇文章是說明 ToDo App 理所當然會希望會有一個簡單的 CheckBox 來讓使用者點擊完成待辨項目。 所以我們會需要建立好一個 UIButton 後,在 Attributes Inspector 中把 Type 改成 Custom,接著把 Image 設定為 square(這裡使用的是 SF Symbol),然後在把 State Config 改成 Selected 後再把 Image 設定為 checkmark.square,記得也要把裡面的文字清空哦。
這裡做的事就是把 Button 設定兩個不同狀態下要顯示的 Image,square 代表著未被勾選的框,checkmark.square 則代表已勾選的框。
設定完之後點擊 Button 並不會發生任何改變,因為我們只是先設定好它在什麼狀態要呈現的樣子而已,所以我們要在點擊按鈕的時候去做處理。
// 勾選,顯示 `checkmark.square` 的 Image
checkButton.isSelected = true

// 未勾選,顯示 `square` 的 Image
checkButton.isSelected = false
最後這個也很重要!因為在我的 App 中這個自訂的 Button 是放在 Cell 中,所以我們要如何知道使用者目前點擊的 Cell 的 IndexPath 這是一個問題,你可能會問不就使用 tableView.indexPathForSelectedRow 就可以了嗎,但是注意我們是點擊 Cell 裡的 Button 所以並不會更新 indexPathForSelectedRow,所以提供了另一個解決方案,就是使用 indexPath 只要向它傳入你目前點擊的 Cell 就可以取得 IndexPath。
// @IBOutlet var tableView: UITableView!
// func indexPath(for cell: UITableViewCell) -> IndexPath?

tableView.indexPath(for: cell)
後記
實際上寫這篇文章應該比我開發的時間還多,邊寫的時候也會發現好像還有很多不懂的細節,不過這就是分享的優點吧!讓自己確認有沒有什麼還不夠瞭解的部分,又能分享出去讓有需要的人知道。
因為全部寫在一篇裡內容太過長,所以省略了很多比較細的內容,如果有需要可以到 Github:vickcoo/odot 上看原始碼,有什麼更好的做法或是有問題的地方都可以留言或是透過其他方式告訴我。
- Email: cwk91405133@gmail.com
- X: @vickcoo
這篇文章是從我原本的部落格搬過來的,打算專心於經營 Medium 做為我的部落格,原發佈時間應該為去年底 2023/11/07。